Sunday, March 23, 2014

DIY Gender Neutral Nursery

It's been a long time since I have posted anything here, and for a pretty good reason- there is a lot going on in our lives!  Yes, we are expecting our first baby in about a month.  Which means we have moved way beyond weddings, and even beyond general home improvements and crafts, and onto... baby prep!  The last few weeks have been focused on nursery-putting-together, and I have definitely been keeping myself busy (probably too busy) with nesting and room prep.  But it is worth it to have a completed baby room, ready for the new addition, whenever he/she arrives!

That's right- we are also keeping the sex a surprise until the baby is born.  Your guess is as good as mine as to what we are having, and we are very excited to find out!  In the meantime, we are going with gender-neutral everything.  1) Because we opted for a surprise.  2) Because I love these colors more than hard-core blues or pinks.  3)  Because we will eventually have more kids, and I'd rather be able to use the same stuff again!  So for now, I went with the gorgeous combination of yellow, white, and gray.

This nursery obviously isn't fully DIY, since we bought things like a crib, and used a dresser we already owned as a changing table, but I did a lot of the decor myself.  Hope it can give some inspiration for other neutral nurseries, or any rooms in general!

Check out some pictures:

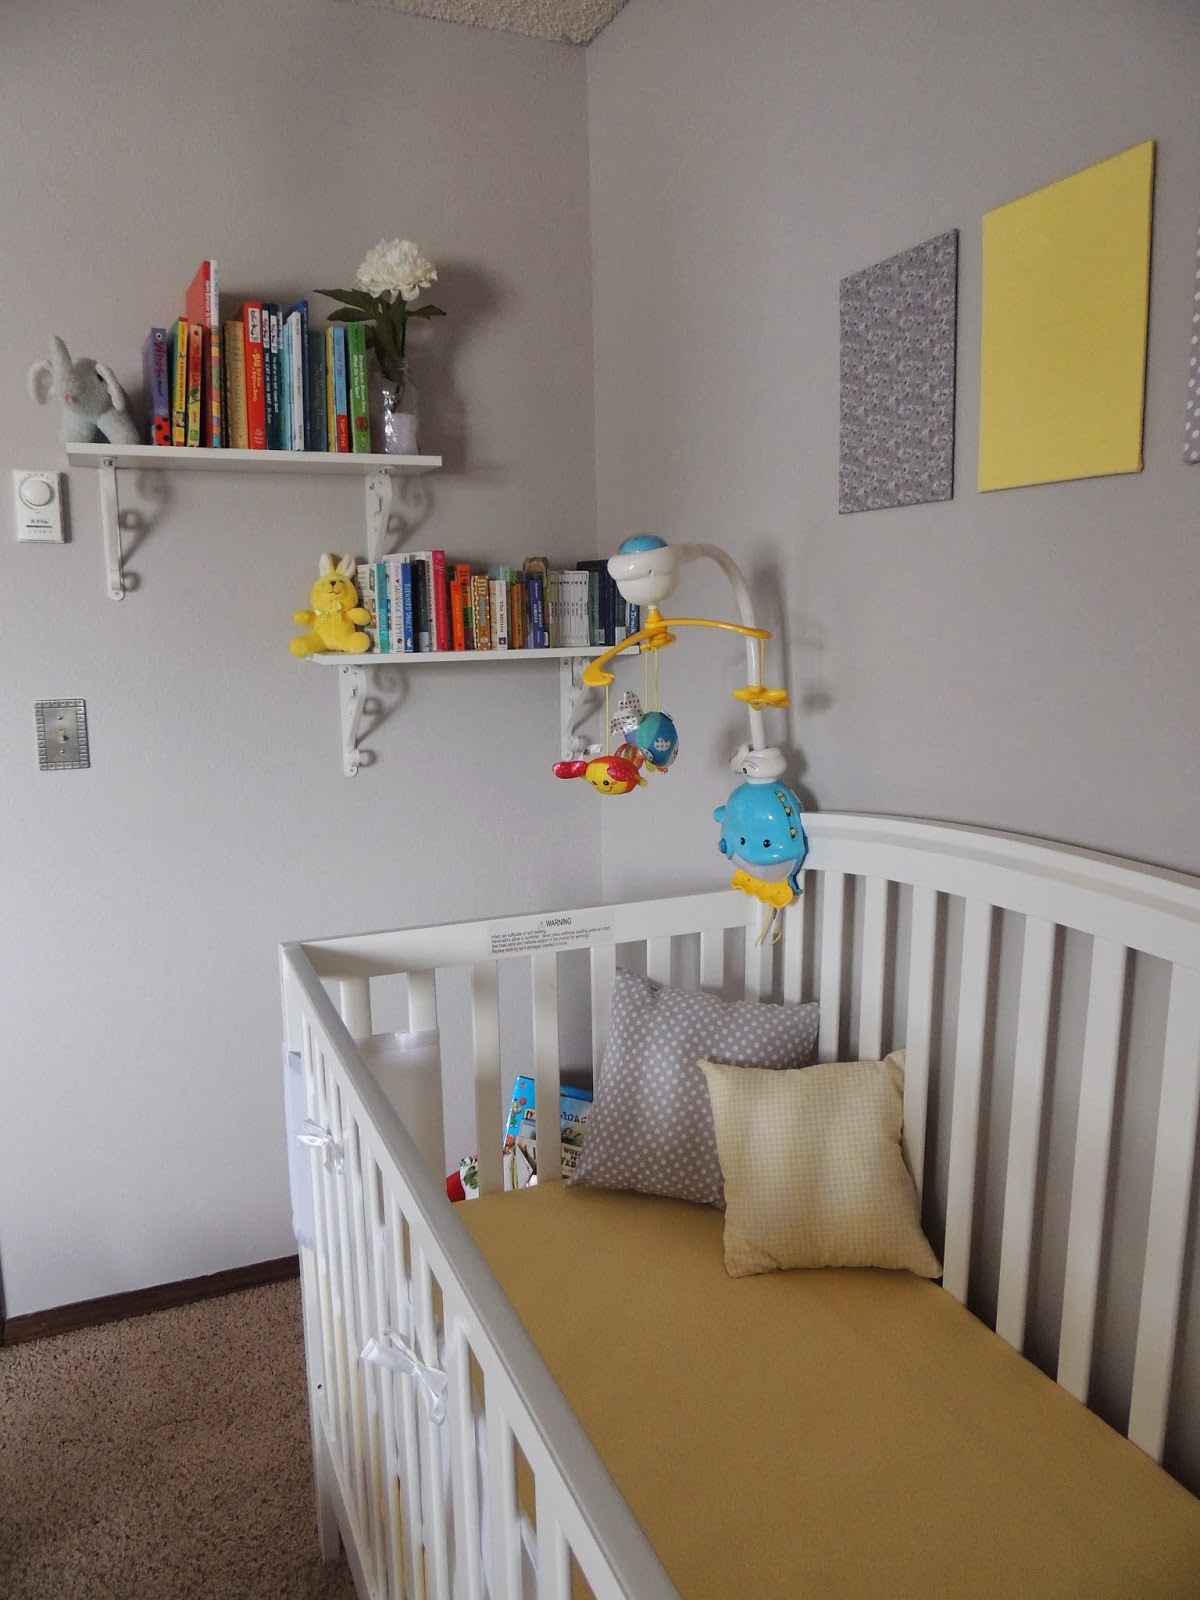
Love the color scheme of gray, yellow, and white!  Luckily, the furniture in this room was already white, so adding a white crib and a new paint color on the walls made it all come together.

It's hard to tell, but I made the crib skirt using a yellow gingham fabric, and this tutorial I found via Pinterest.  I used the same fabric and coordinating fabrics for pillows and the wall decor.  The wall decor is just thin canvases covered in fabric!

For my baby shower, we did an awesome "Bring a Book" theme, so Baby's library is already stocked.  I just hung some shelves (that we already had for this room) and voila!  Books! You can also see here the pillows I made- no tutorial, just sewed cases the right size and popped in the pillow forms- super easy and cute.

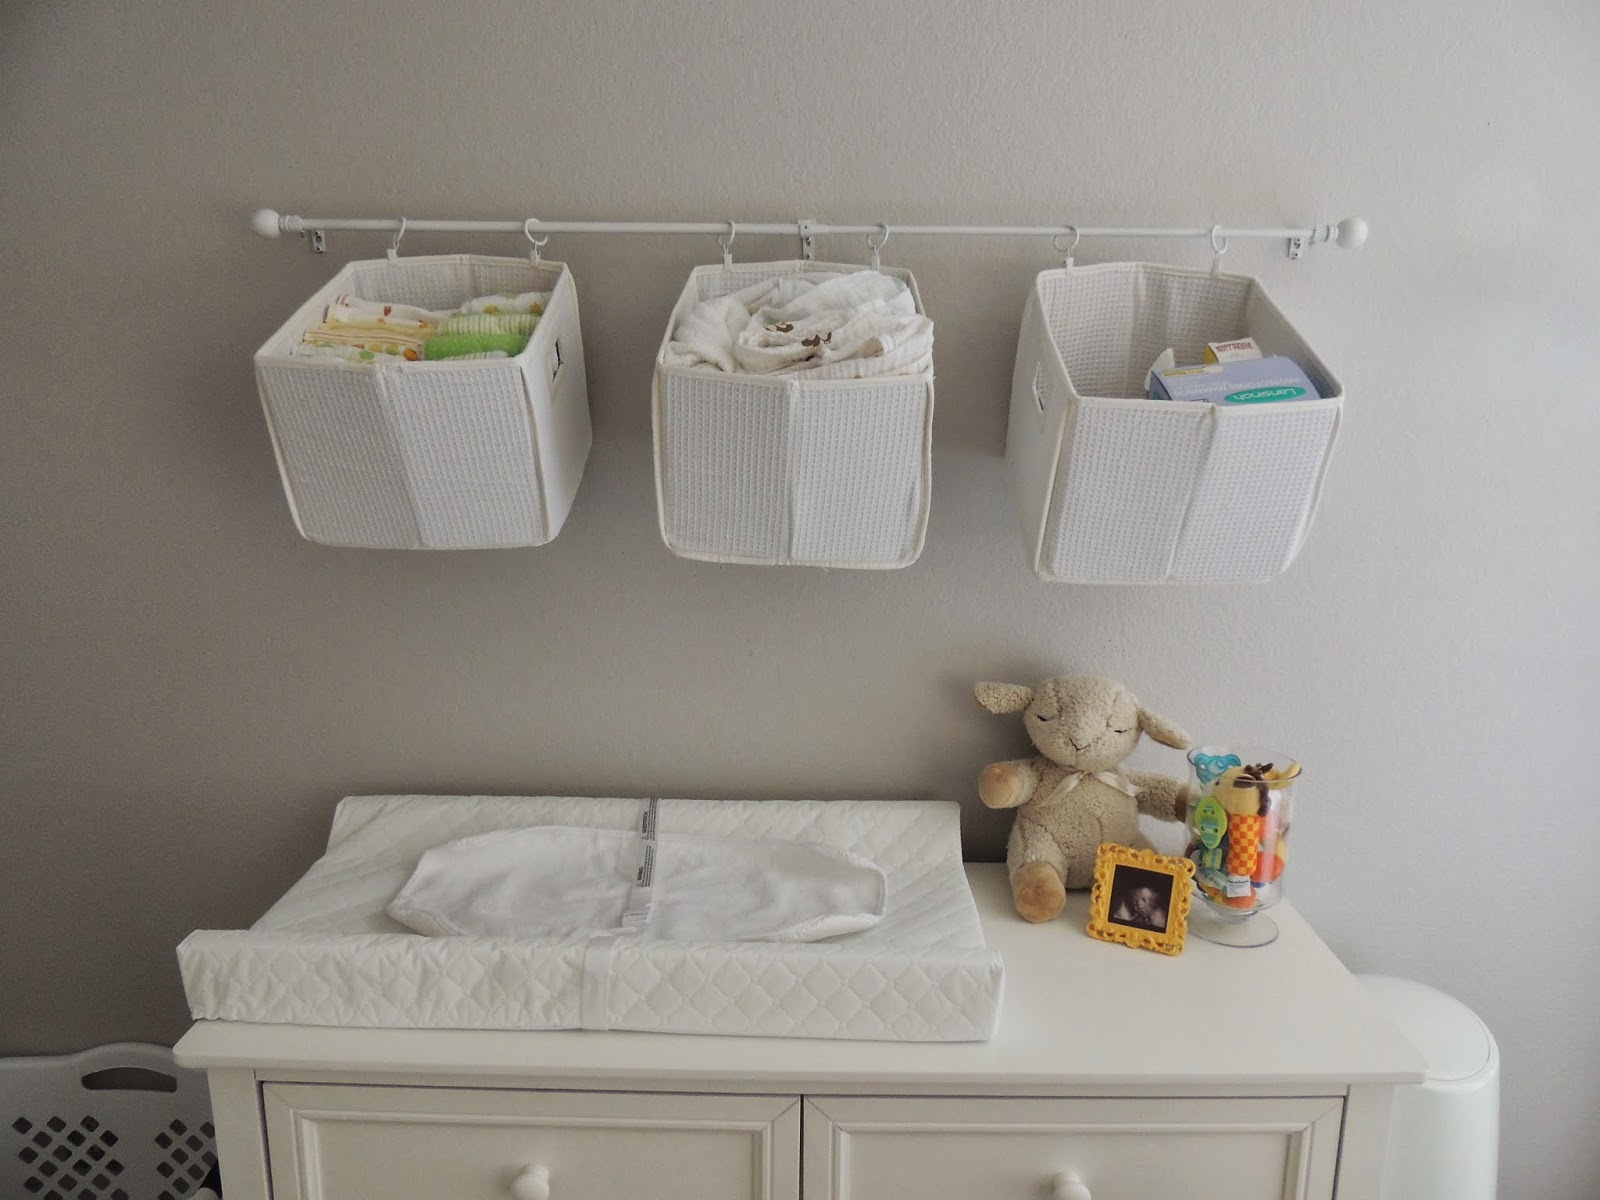
I was looking for something creative to use as "shelving" above the changing table/dresser, and I am so glad I found this idea.  I spray-painted a curtain rod white (so I could use a cheap one I found at Ross), then hung it up above the dresser.  Then I used curtain hangers (also sprayed white) and attached these cheap and cute baskets to make storage space.  They contain burp cloths, swaddlers blankets, and diaper changing gear.  Perfect!

There you have it!  My super cute gender neutral nursery!  Once the baby is born, we will obviously be able to personalize it a bit more, but for now, it is just how I envisioned it.  Hope this brings you inspiration, and hopefully I can post some updates once baby arrives!

Sunday, April 7, 2013

DIY Buffet Tray

A few months ago we got a new buffet for our kitchen- mainly because we needed a lot more kitchen storage space... But the bonus was that I got a whole new area to decorate!  My husband and I decided that one of the things we wanted for the top of the buffet was decanters for liquor/wine/etc.  So I thought, why not get some kind of cool tray to display them on- or better yet- make one!  So, off to Michael's!  I didn't really know what I wanted to do, so I just wandered around Michael's for a while to see what I could use to make a tray. And this is what I came up with!  All in all it probably cost me about $10-15 to make, and was really easy.  The hardest part was being patient as I waited for everything to dry. The cool part is that you can use this same basic idea and customize it with whatever colors and design you want.  Here is what I did:

Materials:
  • Wood Plaque (I used an 11x14 oval, but pick whatever you want)
  • Spray Paint (I used brown)
  • 2 Pieces Scrapbook Paper (Pick whatever design you want!)
  • Scissors
  • Mod Podge (I homemade mine- just equal parts Elmer's glue and water!)
  • Sponge Brush
  • Krylon® Crystal Clear Acrylic Gloss Coating

Instructions:

The first thing you want to do is trace the plaque shape onto your scrapbook paper.  You will have to use 2 12x12 sheets if you use the 11x14 oval, so match the designs up as best as you can.  Nobody will notice if it isn't perfect!  Trace the shape with pencil onto the paper, and cut out the circular shape.  Next, spray paint your plaque and allow it to dry.  Be sure to get the sides really well, since that is the painted part which will show.  Once it is dry, you are ready to Mod Podge!  Coat the tray with the Mod Podge, and stick the paper onto the tray, matching it up as best as you can.  Use your sponge brush to brush the Mod Podge over top of the paper, being sure to smooth it out as you go.  Do a thin coat (if it is too thick, the paper may get wet and tear).  Allow it to dry to the touch, and repeat the Mod Podge coat a few more times.  I probably did about 5 coats, letting it dry in between coats. Once it is all coated and dried, you can finish it off.  Spray the Krylon gloss coating over top- this will make it waterproof and seal it all up.  Once that layer is dry, you are done!  Time to admire your fabulous new buffet tray!


I love how this looks on my beautiful buffet, and it is a perfect size and shape to display our decanters.  It was nice to be able to customize it to perfectly fit into the decor of the room, too!


Saturday, April 6, 2013

DIY Springtime Wreath

I have seen a ton of DIY wreath ideas on Pinterest and other places lately, so I felt inspired to make my own.  It is finally transitioning to springtime here (well, as spring as it gets here...), so I decided to start transforming our house away from the depressing wintertime stuff, and get some joy and color into our lives!  This wreath took about 30 minutes and probably $10 at Michael's to make (as long as you go during a sale and armed with coupons as I always do).  It was really easy and I love how it makes the house look!  Hope it inspires you to make something similar for your house...

Materials:
  • 1 Grapevine Wreath (I used the 14" I believe)
  • 3-4 Bunches of Fake Flowers (I used white and yellow)
  • 1 Small-Medium Wooden Letter (of your last name!)
  • Acrylic Paint (I used turquoise)
  • Paint Brush
  • Hot Glue Gun
  • String/Twine (for hanging)

Instructions:

First you want to paint your wooden letter using your acrylic paint and brush.  I only did one coat and it was fine, and dried in about 20-30 minutes.  Set it aside to dry.  Take your flower bunches and separate them into individual strands or stems.  I found it easiest to stick the flower stems into the wreath and secure them as best as I could by kind of winding them into the wreath.  I also used the hot glue to glue down certain areas, especially at the end points.  Play around with the placement to get them looking how you want.  Once the letter is dry, use hot glue to attach it to the wreath.  Finally, attach some twine/string to the top (my wreath had a loop at the top to make it easier), and cut it to the length you need for hanging.  Hang it up and admire your cheerful springtime wreath!


Wine Cork-Cork Boards

We drink a lot of wine in our house, and we always keep all of our wine corks.  At one point about a year ago, I realized that we just had a vase full of wine corks, and they could probably be put to good use.  So I went Pinterest-ing of course!  There are a MILLION wine cork craft ideas out there, but I wanted to make something that was actually functional in our house.  So I have been making "cork boards" using actual wine corks.  It is super easy and the most important ingredients are corks and a hot glue gun.  Check out some of the ones I have made!

Yard Stick Cork Board

Materials:
  • Yard Stick
  • About 40-45 Wine Corks
  • Hot Glue Gun
  • About 1 inch of string/twine

Instructions:

Before you glue, lay out your corks so that you know you have enough and the proper placement.  I also made sure that they were all facing the same direction and arranged them the way I wanted.  Once you are ready, glue them on one by one, starting at the top.  Once the yard stick is covered, you are done!  So easy.  To hang mine, I made a loop out of a bit of twine and hot glued it to the back of the top, so that it could hang from a small nail.  You could use any type of hanger you want though.  I think it looks great on my thin room-dividing wall!

Framed Cork Board

Materials:
  • Picture Frame (mine was 10x10 and I got it on clearance at Michael's for $2)
  • Spray Paint (if you want to paint your frame)
  • As many Wine Corks as will fill it
  • Hot Glue Gun

Instructions:

Since I wanted to change the color of my frame, I took it apart and spray painted the frame itself brown.  Remove the glass, since you won't be using it.  My frame came with a cardboard backer behind the glass, so that is what I used to attach the corks to. If yours doesn't, you can cut a piece to fit and use that. Arrange your corks in the pattern you want and make sure they will fit, and that you have enough!  I put the frame back together once it was dry (minus the glass) and glued them right onto the cardboard so that I was sure to fill up all the space in the frame.  Glue them on one by one until they are all on there nicely.  And that's it!

There is so much you can do with wine corks, and I hope this provided some inspiration!

Friday, February 15, 2013

Wedding Program Templates

Making your own programs is an easy way to save money and personalize your wedding, as long as you have some time.  For my wedding, I printed the inserts on purple paper and then used a pre-printed designed paper for the cover.  Then I punched two half holes on the edge and fed through some white sheer organza ribbon to tie it all together.  My sister's programs were a bit more complex, as I did a lot of paper cutting and glue-dotting to make them just right.

Regardless of how much effort you want to put into them, you definitely need to know what to say on your programs!  Below I have 2 different templates- one was the basis for my programs and is a bit longer and involved.  The other was the basis for my sister's programs and is more concise.  Hopefully these will offer some guidance for future brides making their own programs!


Here is the longer, more detailed template (click to make it larger):


Here is a more concise version (click to make it larger):


Monday, February 11, 2013

DIY Card Holder

This is one of those details that a lot of people don't think much about.  At your reception, you will have a gift table, but what about the cards?  You will definitely want something to hold the cards, and it is best if it is a container that will hold the cards in securely (so nobody could take one out...).  There are a ton of pre-made boxes out there that you could buy, but they aren't usually very special.  You could also make something yourself out of boxes etc, but even that can be more work than it is worth (though I have seen some really pretty and unique containers). 

For my wedding, I went with something cheap and easy, but unique and beautiful.  I used a bird cage. Now, you can buy special "wedding" bird cages, but like all things "wedding," they are expensive and not the best quality.  Instead, my mom found a decorative birdcage at TJ Maxx for around $10. You could also look at places like Ross, Marshalls, Home Goods, or even a thrift shop.  They are pretty common in the "decor" sections.  The one she bought was a copper/bronze color, so we did a few things:

1.  Spray paint the whole thing.  We decided on white, since it was a wedding after all, and it would match with any decor.

2.  Embellish with tulle/ribbon.  You do not even need to do this, but it was my kind of thing.  I wrapped a bit of white tulle around the top and tied a bow.  Then, for my motif, I added a jewel to the middle.  We actually used the same bird cage for my sister's wedding, but instead of the jewel I added some black tulle to the top. 

3.  Set it up on your gift table and wait for the cards to come in!

Here you can see my birdcage on the gift table during the wedding:


Wednesday, February 6, 2013

Military Weddings with Your Own Twist

Have I mentioned that my husband is in the US Air Force?  Well he is.  That being the case, we wanted to do a traditional military wedding.  Except, I still wanted to do things my way and incorporate all the fun and colorful things that I loved.  So I decided to meld it all together with my own twist!

The most prominent issue for me in regards to the military wedding was the color scheme. The problem is that US military uniforms are not just plain black suits/tuxes.  For the Air Force for example, they are navy blue.  Really, they look great, but the question becomes: what do all the other wedding party members wear?  This was a very stressful issue for me! I cannot stand the thought of navy blue mixing with black- they are far too similar but different enough that they would just clash.  So that eliminated tuxes for the guys, as they pretty much come in black.  Next, we considered navy blue to match with the groom, but that made it tough to match the shade of navy blue to his uniform. Navy blue is tricky! I had already planned to wear white, and I decided on purple for the girls (which looks great with navy blue), and silver accents for the wedding, so the problem was just the boys!  Eventually, we came across these beautiful grey suits which looked great with the rest of the color scheme.  In the end, I love how the look came out with me standing out amongst the girls in purple and my husband standing out in his blue amongst the guys in grey. Of course purple looks good with blue, grey, or black, but I liked how we had a pretty unique style using all of these colors for the whole bridal party!  Check us out:


The next thing you must have for a great military wedding is the Sabre Arch.  This is so classic and so fun!  I won't share all the details, but basically right after the end of the ceremony or entering the reception, you and your new husband walk under the arch made by the military members in formation.  You kiss at the end, and everyone cheers. It is a lot of fun and makes your wedding really special.  Talk to your service member spouse-to-be about getting this set up.  You can have your military friends serve for you, or ask a local base or detachment to supply volunteers to come serve.  Oh, and make sure you get the sabres (usually from a local base).  Typically there are 6 or 8 of them in uniform to make the best arch.  Check out the pictures from our wedding:


There are a few more traditions that you can use, but the other one that we chose to use was incorporating a prayer/acknowledgement of military service members into our ceremony.  We had a traditional Lutheran ceremony, which included a time for prayers, and we wrote one specially dedicated to military service members.  We also included a little blurb in our programs.

Like I said, there are more ways that you can include your military traditions into your wedding day, but these were the ones that worked for us.  Military couples should incorporate as much or as little military traditions as they want, and remember- you can still have your own fun and exciting ideas in there as well!